Welcome back to secrets of a technical artist, today I will take you through our art pipeline, and I’ll be showing you some of the tools I’ve created to simplify the process of making our art assets.

Hopefully by the end of this post you’ll have a greater knowledge of our working process, and perhaps you’ll take away some ideas for how to make things easier, so you can concentrate on what matters – making the game look good.

Screenshot: Preloaded Tools for Maya

Writing Tools

Here at Preloaded the artists mostly work within Maya, Photoshop and Unity. Mostly these programs work really well for us out of the box. But sometimes we have specific needs that they can’t naturally accommodate, or we can see ways of improving what is already there. Thankfully they all allow you to write scripts to modify how they work, which has been really handy for us.

In Maya I have organised this into a Preloaded panel and shelf which I have organised into tabbed sections between modelling, UV, animation and rigging. It’s designed so that I can quickly add tools to it, whilst keeping it clean and logical to work with. It’s important that the tools I make are intuitive to use, they should be easy to pick up for any artist.

Rigging Tools

An example of where scripting has proved really handy is with rigging. I see rigging as essentially like making a puppet; the better the puppet, the easier it is to make the animations. The time-consuming nature of rigging can lead us to settle on less intuitive rigs, so there is a real need to make this job simpler.

The characters in our games are rarely generic bipeds and often require unique setups. This means we need tools that could be combined into varying setups. A solution I developed was to divide the problem into 3 different categories: “Limb”, “Spine” and “General Control”.

Video: Animation & Rigging on Immuno Defense

“Limb” covers any kind of arm or leg, whether animal or human. I created a script where all you need to do is select the joints, click a button, and you get a fully functioning limb rig, complete with IK/FK switching, squash and stretch and foot roll (basic ideas for the rigging initiated ).

“Spine” covers most multi-bone setups like body spines or tails. For this I created a Create Spine button that makes a bendy setup for any number of joints. These have two main controls at the beginning and end, with a central control for adjustment. The controls work to keep the spine in a natural curve, making animating them really instinctive.

The limb and spine buttons cover the majority of the most complicated parts of any proportioned creature. I added some buttons to create general controls, and together these allow us to create fun rigs in a fraction of the time they would ordinarily take.

Video: Rigging an Ant using Preloaded Rigging Tools
Seamless Workflows

Very often we will dive back and forth between Maya, Unity and Photoshop, so it was important for us to develop tools that organise the workflow.

Unity can use Maya and Photoshop files directly so it is tempting to work directly from within the Unity Asset Folder. The problem with working this way is that all your work-in-progress stuff lives inside the game all the time – this can get messy quickly and greatly increases the size of the game. To alleviate this issue, we create an Assets_Source folder for all our working assets, and make export scripts to save out our assets to the corresponding Assets folders. It really helps to have a separation between working assets and in-game assets. Having this export step also allowed me to clean up and check our assets as we export them, making the process far less error-prone.

Animation Exporting

The export process has allowed us to modify the animation pipeline. We wanted to have all our animations stored in 1 file, which ordinarily means that we would need to manually split up and name the animations in Unity. Also, trying to work with one Maya file for all the animations can be a real pain. My solution was to work in the way we wanted, either in 1 or in multiple files, and the export puts them altogether into 1 file. It also exports a text file which we created an Editor script in Unity to use to do all the naming and splitting for us. This has made the process of adding, subtracting, or modifying our animations straightforward, without any work needed in Unity.

From Unity to Maya and back again

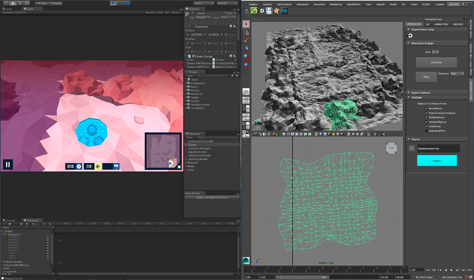
Generally the direction of the pipeline goes from Maya to Unity, but sometimes we have wanted to take the scenes in Unity and bring them back into Maya. For example in TyrAnt, we wanted to use Maya to bake lighting onto our environment, as we weren’t happy with the result we were getting in Unity.

Screenshot: Environment Creation Immuno Defense

To fix this I wrote scripts in Maya and Unity to export the layouts of our scenes and import them back into Maya. This also allowed us to use Maya to recombine meshes in our scenes, which reduces the number of draw calls in the game, which is a great optimisation. This combination works when all the combined objects share the same material, so they need to share the same UV space. With many objects the job of creating the new combined texture manually can be painful. To help I also wrote a UV adjustment script that wrote out the changed UVs to a file. I then wrote a Photoshop script to read the file and to create the new texture from the previous ones, adjusted in the same ways as the UVs were. Making this job essentially only 2 clicks now allows us to easily iterate this process when the environment layouts change.

Photoshop to Unity; Quick GUI

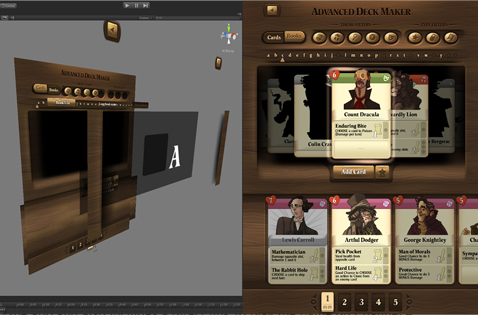
We also have started to develop tools in Photoshop to help speed up our process. A recent script I have been developing is the the photoshop to Unity GUI export script. This exports the whole GUI layout in a single step into a format that Unity can load. This saves us having to rebuild our GUI in Unity after already having done it in Photoshop.

Screenshot: GUI export script from Photoshop to Unity

Currently the script works well for the initial export, but loses use after the scene has been edited in Unity. My future thoughts are to make something to perhaps write back to Photoshop so they can both be updated in unison, not quite sure how thats going to work, but I’m always thinking of how I can improve things.

In my next post, I’ll be taking you through some of the different kinds of FX and R&D I’ve been exploring here at Preloaded.

Jamie Niman

Jamie is a Technical Artist at PRELOADED.